Happy day my dear frinds.To day I am here to describe you about CURD example in CI.
Here I will devide CRUD into four sub parts.
That is Create,Update,Retrive and Delete.
In this lesson I will example I describe the Create example and others are in next lessons.
Step 01 : Create a databse called data using php my admin.
Now create table called info inside the database called data.
And add two fields as ID(varchar 20,Primary key) Name(varchar 30) in to the table.
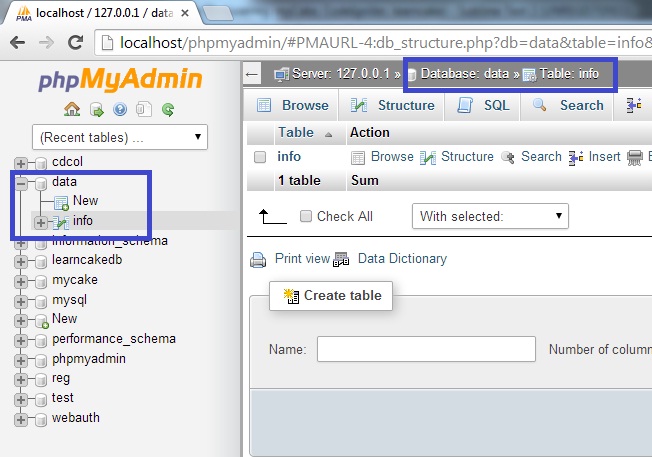
Now your phpmyadmin is look like follows. Look at the blue colored squares carefully.
Here I will devide CRUD into four sub parts.
That is Create,Update,Retrive and Delete.
In this lesson I will example I describe the Create example and others are in next lessons.
Step 01 : Create a databse called data using php my admin.
Now create table called info inside the database called data.
And add two fields as ID(varchar 20,Primary key) Name(varchar 30) in to the table.
Now your phpmyadmin is look like follows. Look at the blue colored squares carefully.
Now I have to configure the database.php file located in C:\xampp\htdocs\CodeIgniter\application\config directory.
Open the database.php file and it look like this.
$db['default']['hostname'] = 'localhost';
$db['default']['username'] = '';
$db['default']['password'] = '';
$db['default']['database'] = '';
$db['default']['dbdriver'] = 'mysql';
$db['default']['dbprefix'] = '';
$db['default']['pconnect'] = TRUE;
$db['default']['db_debug'] = TRUE;
$db['default']['cache_on'] = FALSE;
$db['default']['cachedir'] = '';
$db['default']['char_set'] = 'utf8';
$db['default']['dbcollat'] = 'utf8_general_ci';
$db['default']['swap_pre'] = '';
$db['default']['autoinit'] = TRUE;
$db['default']['stricton'] = FALSE;
Now chane them as you want and my edited database.php file is like below one.
$db['default']['hostname'] = 'localhost';
$db['default']['username'] = 'root';//because default user name is root
$db['default']['password'] = ''; //because default password is empty
$db['default']['database'] = 'data'; //because our created database is data
$db['default']['dbdriver'] = 'mysql';
$db['default']['dbprefix'] = '';
$db['default']['pconnect'] = TRUE;
$db['default']['db_debug'] = TRUE;
$db['default']['cache_on'] = FALSE;
$db['default']['cachedir'] = '';
$db['default']['char_set'] = 'utf8';
$db['default']['dbcollat'] = 'utf8_general_ci';
$db['default']['swap_pre'] = '';
$db['default']['autoinit'] = TRUE;
$db['default']['stricton'] = FALSE;
Now database configuration is completed.
Step 02 : Now we need to create MVC and first I will create the view and save it as getview.php in
C:\xampp\htdocs\CodeIgniter\application\views directory.
In this file I am going to collect the data.
My getview.php is look like this.
<?php echo form_open("getcontroller/reg"); ?>
ID: <input name="id"/>
Name: <input name="name"/>
<input />
<?php echo form_close(); ?>
Now I need a controller called getcontroller.php and save it in C:\xampp\htdocs\CodeIgniter\application\controllers directory.
And create the model as getmodel.php in the C:\xampp\htdocs\CodeIgniter\application\models diectory.
[At the moment these two files are empty.]
Now add the codes.Here is my getcontroller.php file code.
<?php
class getcontroller extends CI_Controller{
public function getview(){
$this->load->view('getview');
}
public function reg(){
$this->load->model('getmodel');
$this->getmodel->getreg();
}
}
?>
Here is my getmodel.php file
<?php
class getmodel extends CI_Model{
public function getreg(){
$data = array(
'ID'=>$this->input->post('id'),
'Name'=>$this->input->post('name')
);
$this->db->insert('info',$data);
}
}
?>
Now all the files are ready. Go to the web browser and type in address bar
http://localhost/codeigniter/index.php/getcontroller/getview
Opps It is not working !!!!!.Do not be afraid.It is due to our autoload files are not configured.
Open autoload.php in C:\xampp\htdocs\CodeIgniter\application\config directory and edit these codes
$autoload['helper'] = array('url','form');
Now retype this again
http://localhost/codeigniter/index.php/getcontroller/getview
you will see the below output
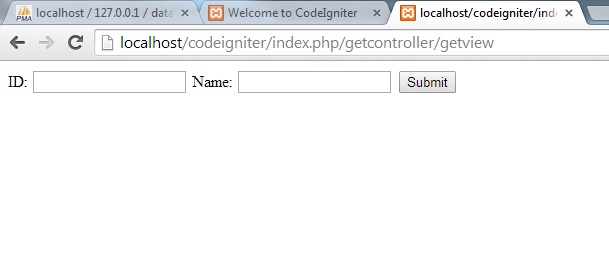
Fill the form and insert data and click on submit button.Your data will be store in our database.
Visit the database and see the data we have stored.
N.B----------------
This is a simple example how insert data into a database table In CURD.No validation has done.In next lesson I will do the validation part.
Now be happy. :)
-Ujitha Manujapriya Sudasingha-
Visit the database and see the data we have stored.
N.B----------------
This is a simple example how insert data into a database table In CURD.No validation has done.In next lesson I will do the validation part.
Now be happy. :)
-Ujitha Manujapriya Sudasingha-